
Getting Started (3): Setup ESP8266 Dev Board
For all projects on SimpleIOThings, you’ll need to setup ESP8266 Dev Boards. The dev board is the most important piece of hardware in our projects because they execute computer programs that power our sensors and connect to the internet. In this “Getting Started” tutorial, we’re going to teach the dev board to understand a programming language.
One of the reasons why IoT devices can be built so easily now is because of the ESP8266 development board. IoT enthusiasts have been excited about the ESP8266 because its a full system on a chip (SoC) that has onboard wifi connectivity that can cost as low as 3 dollars. The IoT community has been building with Raspberry Pi and Arduino microcomputers for a while now, and while capable these computers cost up to $35 dollars, don’t have onboard wifi, and aren’t easily powered with common ports like microusb. The standalone ESP8266 chip is great, but doesn’t have an easy to use power supply and it’s hard to configure without special cables.
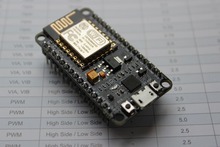
The ESP8266 development board is a bit bigger and a little more expensive than standalone ESP8266 chips, but its easier to connect to a PC, upload custom software, and it can be powered with a common microusb cable.

ESP8266 standalone chip (right) and ESP8266 Development Board (left)
Also, the price of the board is generally less than $5 dollars! This means that many simple IOT devices can be built for 10 dollars or less. Here’s a link to the dev board we’ll be using in our projects.
 AliExpress.com Product – 2015 New product Wireless module NodeMcu Lua Wifi Nodemcu WIFI Network Development Board Based ESP8266,High quality products
(Note: I can already hear a thousand nerds out there groaning because I’m using the dev board instead of the standalone chip. Remember this page is about building IoT devices easily. This isn’t the cheapest possible way to make a device, but in my opinion its worth it to pay a couple extra dollars for the convenience of a microusb interface and power connection.)
When it arrives in the mail its just a mashup of metal and silicon, but after this tutorial it will understand how to execute commands in a powerful software language called “Lua” (which is in the Python family of computer languages for you nerds out there). Don’t worry though, you won’t be expected to code anything.
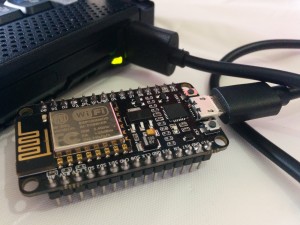
You should connect your dev board to your computer’s USB port using your cable like so. If you have windows computer and an internet connection, the drivers for the board should automatically load. If for some reason it doesn’t you can Google “NodeMCU drivers” and a number of websites with appropriate files should show up. The drivers you need may depend on the type of dev board you purchased. If you purchased the CP2102 variant (which is recommended) you will need to download drivers for that board type. Drivers are available online for the CH340 variants as well.
Once your drivers are installed, you’ll also need to determine which communications port the device is connected to. Click your “Start” button and type “Device Manager.” Your device manager should pop up. Click and expand the “Ports (Com & LPT)” menu and you should see your device listed there. In my case, my ESP8266 dev board’s port was set to COM18. For now just take note of that and jot it down somewhere.

Now we have to install “firmware” on to the dev board. This firmware will allow the board to execute programs and understand Lua. To do this we need to download a “flashing” program and the firmware itself. The flashing program will use the firmware file to load firmware onto your board.
The latest versions of the flashing program can be found on github, a popular and trusted site for computer programmers to collaborate on projects. Pick the appropriate flasher based on whether your PC is using a 32-bit or 64-bit operating system.
– 32-bit ESP8266 Flasher
– 64-bit ESP8266 Flasher
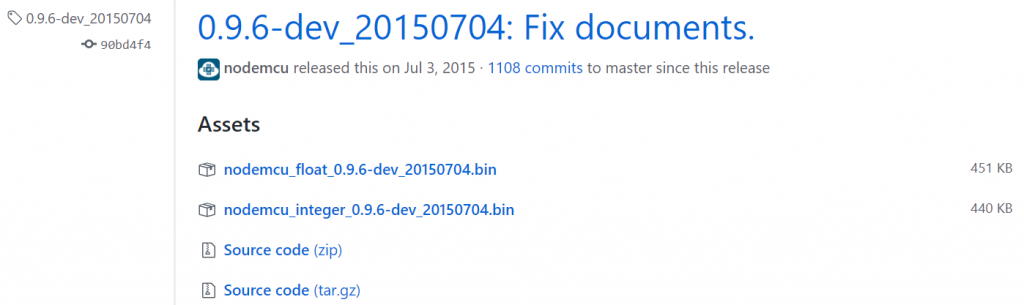
The firmware file can be found on Github. Follow the link below. As of 1/3/2018, the file version that works best is at the bottom of the release page. It is the “integer” version and it will look something like this: [nodemcu_integer_0.X.X-dev_201XXXXX.bin]. A screenshot is also provided below for reference.
There are also some other interesting places to get firmware for the ESP8266 dev board, including a custom firmware builder, however a number of users have reported trouble with the firmware they get from other sources. For now, I recommend sticking with the Github release.
Okay, if you’ve made it this far, you’ve connected your dev board to your PC, obtained the port number, installed your dev board drivers, and downloaded the ESP8266flasher program and the firmware .bin file. Awesome.
Now find your downloaded ESP8266 flasher program and start it. This should pop up:

Change the port number to the port for your ESP8266 Development Board, which you jotted down earlier.
Now click the Config tab, and click the topmost gear on the right hand side.

Once you click the gear icon, use the dialog box to find your firmware (.bin) file in your downloads folder and click “Open.” Then go back to the “Operation” Tab and click “FLASH!” Once the progress bar moves all the way from left to right, your dev board can now understand the Lua language. Congrats!
The last task in this step is to download a program called LuaLoader and use it to connect with your dev board. LuaLoader is a program that can understand the Lua programs your board is running. It also has a lot of handy tools that let you setup wifi, read digital outputs, and so on. Once again, Github has what we need.
– LuaLoader @ Github
Once you’ve downloaded LuaLoader, extract the zip file (if needed), open Lualoader.exe as an administrator. To open as an administrator, right click Lualoader.exe, and then click “Run as an Administrator.” Once open, click Settings, Com Port Settings, and set the port to the one your dev board is connected to and click “OK.”

Then click “Connect” in the menu bar of the Lualoader program. Your ESP8266 dev board should flash an LED for a second, and your Lualoader will show you some strange characters. Congrats, you now have a dev board that is ready to receive a program.

If you were able to use this tutorial to install firmware onto your dev board and then connect it to your Windows PC, then you’ll be able to upload custom software to it to build several smart buttons and sensors. Congrats! Now take the next step and check out some of the sensor building tutorials.
SimpleIOThings • November 2, 2015
Charlie Fairchild January 3, 2016 - 11:55 pm
Excellent ESP8266 intro! My boards are on order, and I’m looking forward to getting started with them.
SimpleIOThings January 4, 2016 - 2:48 am
Great to hear Charlie. Let us know how the build went and what you used it for! I’m always interested in hearing what uses they have for simple IOT devices.
animal June 2, 2016 - 8:10 am
I appreciate you sharing this article.Thanks Again. Awesome.
Greg July 5, 2016 - 4:52 am
I decided to attempt to build the DIY Wifi Door Sensor. I’m a complete novice at projects like this, however the instructions made it sounds relatively simple so I went ahead and bought all the components. Upon setup I’ve managed to get stuck at the ESP8266 Dev Board setup step. I’m trying to use a MAC and would therefore like to know whether you have instructions for MAC users. Or if you could point me in the right direction please.
I’m also confused by the following message which was on the description for the board on eBay.”Short circuit hat connect to the electric flash model,take off and then go to the normal state.” Do you have any idea what it means?
Thanks, Greg
flywire December 14, 2016 - 11:10 am
So – just connect to USB with a micro USB cable, no USB-ttl converter required. I thought it would blow the ESP8266 chip. Is direct connection just with NodeMCU?
SimpleIOThings October 9, 2017 - 6:36 am
The NodeMCU development board is setup to receive power directly through its microUSB port. I’d recommend using a power source that is 5V, 1 amp.
John Brannen March 23, 2017 - 4:45 pm
This is a great intro and was very helpful. Don’t take the following as a criticism because I know how external links change over time and when this was originally written the links surely worked perfect. However I did find a couple things a bit confusing that took me a while to figure out. I am only pointing this out so that others can save some time.
1. the linked 64-bit ESP8266 Flasher program did not work on my 64-bit windows 7 computer. It says that it is not compatible with my version of windows. I think that it may be inadvertently the 32-bit version. I tried the other link to the 32-bit version and had identical results. I wound up tracking down the flasher program using a Google search in a different site that was not github.
2. The link to the NodeMCU Firmware github site takes you to the code page and the current version doesn’t include a pre-built version of the firmware (ie: no .bin file). I think a better link would be to: https://github.com/nodemcu/nodemcu-firmware/releases where there are older pre-built versions of the firmware. I wound up using version 0.9.6 because it was prebuilt.
Thanks again for the great write-up.
Michael L April 5, 2017 - 6:29 pm
They no longer support the Firmware.Bin on Github. They have an option to compile your own firmware. I have zero idea how to do this. Anyway you can upload the old .bin you have for this project?
Many Thanks,
Michael
Aaron April 25, 2017 - 12:42 am
Hello this is very cool stuff but…The issue is that I cant find the port in device manager and
the latest firmware that with the link below doesn’t take to a simple download it takes to a page of rather complicated files. Please help my son and I are trying to wow them at a science fair by building a couple of these we have ordered all the materials you suggested but are now stuck 🙁
“The latest version of the firmware file can also be found on github. Be sure to download the “integer” version. It will look something like this: [nodemcu_integer_0.X.X-dev_201XXXXX.bin]”
SimpleIOThings October 9, 2017 - 4:28 am
Sorry I wasn’t able to reply sooner. I didn’t know this, but when you put up a website, its immediately a target for all sorts of spam bots. There are thousands to sift through before you get to an actual human comment. Your comment was buried under a few hundred bot generated spam comments awaiting approval.
Its hard to say what the issue is without seeing it myself. However it sounds like to me that you need the drivers to interface between the Dev Board and the PC. Once you have those, that should allow you to find the device in device manager, and connect on the right COM ports.
Dermot May 27, 2017 - 5:22 pm
I’ve used the door status project as an alarm alert. At the moment i have an alarm that sends me a text message when the alarm is triggered. This means I have to remember to update the SIM card with €5 every 6 months, which I continually forget to do.
So I connected the GND and D2 on my ESP to a spare solid state relay I had lying around. I have the it triggered by connecting it to my internal siren i.e. when the alarm triggers the siren and relay receive 13v thereby connecting GND and D2.
One thing surprised me though. I set the interval between detections at 2 minutes to cater for accidental alarms. So I have 2 minutes to reset the alarm. However if I’m not in the house and somebody else accidentally triggers the alarm I get an alarm notification and I don’t know if it’s genuine or not. I was hoping that if the siren was sounding for OVER 2 minutes then I would get a second notification indicating a real alarm incident. But this doesn’t happen. After the 2 minute interval when the sensor starts again it doesn’t send a notification when the GND and D2 are still connected! Unfortunately this means I don’t know if it’s a false alarm or not.
The other comment i’d make is that the direction to the latest firmware on Github doesn’t contain the >bin file need to load the new firmware. The actual files that go into making the .bin file are there but I would be better if there was a direction to a completed .bin file. i eventually googled and found an “integer” .bin file.
Apart from that a really great project and I’v bought you a beer!